Preparing a New Hard Disk
When you feel you need an additional large amount of storage space, you may purchase a new hard disk to mount to your existing system. Once you have physically installed your new hard disk according to the manufacturer`s directions, HDToolBox is used to configure your system with all of the new hard disk`s specifications.
In order to prepare the hard drive, follow these steps:
-
Double-click on the HDToolbox icon.
You will be presented with the Hard Drive Preparation, Partitioning and Fromatting" window. The new hard drive will be listed as Unknown".
-
Select the drive Unknown".
The drive will be highlighted.
-
Click on the Install Drive gadget.
-
Follow the on-screen instruction and confirm any requesters that may open until you have returned to the main screen of the program.
Modifying File Systems
|
Note:
|
This function is intended for advanced users.
|
A file system is software that controls how data is organized on a disk. Amiga systems use the FastFileSystem (FFS), which is an efficient file system saving time and hard disk space.
You may decide to switch to a different file system - perhaps to an upgrade in AmigaDOS or to a file system you`ve produced yourself. HDToolBox allows you to modify the list of available file systems by adding new file systems, deleting file systems, and modifying existing file systems.
|
Caution:
|
Changing the file system of a partition that contains data might make the data inaccessible.
|
Advanced users may choose to use the File System Characteristics screen to modify a partition`s file system. Most users can safely ignore this screen.
To modify a partition`s file system, start from the Hard Disk Preparation, Partitioning and Formatting screen:
-
Select the Partition Drive gadget.
The Partitioning screen will be displayed.
-
select the Change... gadget.
The File System Characteristics screen will be displayed. At the top of the screen, it shows the name of the selected partition.
You must next choose the file system for the selected partition by clicking on one of the following gadgets:
Standard File System
This is the default file system. If this system is selected, the following options will also be available:
Fast File System
Uses the modern Fast File System - this option should only be disabled if you want to use an existing partition on a hard drive that was installed using a very old version of AmigaOS.
International Mode
This option should always be enabled unless you know exactly what you are doing.
Directory Cache
Using the directory cache is not recommended for hard drives, only in very special cases should this option be activated.
Custom File System
This allows you to install your own file system.
|
UNI\01
|
This will allow you to reserve an area on the disk without a partition. this area can be set aside for some special use, such as for a UNIX operating system.
|
After you have chosen a file system its values will be filled into the fields automatically. To manually change any of the following values, click on the box, delete the existing information, type the new number and press Return. (Hex numbers must begin with Ox.):
|
Identifier =
|
Displays the hex number (code) that tells AmigaDOS what file system is being used. The Identifier can only be modified when using a Custom File System.
|
|
Mask =
|
Displays the hex number that defines which areas of memory can be used with Direct Memory Access (DMA). Mask is available when using Fast File System and Custom File System.
|
|
MaxTransfer =
|
Displays the hex number that determines the maximum number of bytes to be moved during each DMA transfer. MaxTransfer is only available when using Fast File System and Custom File System.
|
|
Reserved blocks at beginning:
|
Displays the number of blocks reserved at the beginning of the selected partition for DOS usage. This value defaults to 2, and normally should not be set to less than 2.
|
|
Reserved blocks at end:
|
Displays the number of blocks reserved at the end of the selected partition, for DOS usage. This value defaults to 0.
|
To return to the Partitioning screen without saving your changes, select the Cancel gadget.
To save your new file system characteristics:
-
Select the Ok gadget.
You will be returned to the Partitioning screen.
-
Select the Save gadget in the Partitioning screen.
You will be returned to the Hard Drive Preparation, Partitioning and Formatting screen.
The changes will automatically be saved to the drive.
File System Maintenance
The File System Maintenance screen allows you to modify the list of available file systems. This section tells you how to:
-
Add a new file system
-
Delete a file system
-
Modify an existing file system
To use this screen to perform any of the above, you must start from the Hard Disk Preparation, Partitioning and Formatting screen:
-
Select the Partitioning gadget.
The Partitioning screen will be displayed.
-
Select the Add/Update... gadget.
You will be taken to the File System Maintenance screen.
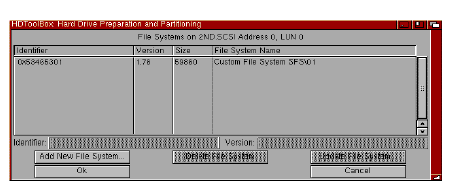
At the top of the screen, the selected drive is displayed by address and LUN. Below, in the scrolling list, each file system stored on that drive is displayed, showing its Identifier hex number, Version number, Size in bytes, and File System Name.
Adding a New File System
Start from the File System Maintenance screen:
-
Select the Add New File System... gadget.
A file requester will appear.
-
Use the file requester to enter the full pathname to the location of the new file system or to browse your system for the file system to install. Click on the OK gadget of the file requester once you have finished your selection.
-
Select the Ok gadget to retain your changes.
You will be returned to the File System Maintenance screen.
-
Select the Ok gadget in the File System Maintenance screen.
You will be returned to the Partitioning screen.
-
Select the Save gadget in the Partitioning screen.
You will be returned to the Hard Drive Preparation, Partitioning and Formatting screen.
-
The changes will be saved to your drive automatically
Deleting a File System
Start from the File System Maintenance screen:
-
Select the file system you wish to delete.
The selected file system is highlighted. To select a different file system, click on the desired file system.
-
Select the Delete File System gadget.
The selected file system will disappear.
-
Select the Ok gadget in the File System Maintenance screen.
You will be returned to the Partitioning screen.
-
Select the Save gadget in the Partitioning screen.
You will be returned to the Hard Drive Preparation, Partitioning and Formatting screen.
-
The changes will be saved to your drive automatically