Adjusting the Size of a Partition
-
Click and hold the left mouse button on the blue triangle under the partition bar.
-
Slide the triangle to the new position and release the button.
You cannot expand the size of a partition over a partition which already exists.
The new size of the current partition will be displayed under the triangle.
Sliding a Partition Within the Partitioning Bar
You will need to slide partitions to make room for a new partition or to consolidate portions of unused space. Partitions will only slide on unused space in the partitioning bar. They will not slide over existing partitions.
-
Click and hold the selection button on the partition you wish to move.
-
Still holding the button, slide the partition to where you want it and release the mouse button.
If a partition is too small to click on conveniently, you can also move left and right through the partitions by using the left and right arrow keys, respectively.
Adding a New Partition
You cannot make a new partition over a partition which already exists. If all of the space on your hard disk is in use (i.e., no unused space in the partitioning bar), you will first need to make space for a new partition by making existing partitions smaller (see Adjusting the Size of a Partition"). Unused space is shown as a gray block.
-
Slide existing partitions so you have a solid block of unused space within the bar for your new partition.
-
Select the New Partition gadget.
The New Partition gadget will be highlighted.
-
Click on the unused portion of the partitioning bar where you want your partition.
A new partition will fill the previously unused space. The Partition Name text gadget will display CHANGE_ME.
Renaming a Partition
-
In the partitioning bar, click on the partition you wish to rename (making it the current partition).
-
Click in the Partition Name text gadget that displays the name of the current partition.
-
Delete the existing name, type in the new name and press Return. (It is best to avoid using spaces in a partition name.)
Deleting a Partition
-
In the partitioning bar, click on the partition you wish to delete (making it the current partition).
-
Select the Delete Partition gadget.
The selected partition will be deleted, and the leftmost partition in the partitioning bar will now become the selected partition.
Using HDToolBox`s Default Setup for the Drive
HDToolBox contains a number of default setups if you decide not to form your partitions manually: using the Default Setup" menu you can either tell HDToolbox to split your hard drive into a reasonable amount of equally sized partitions, based on the size on the drive, or to split the drive into 1 through 8 equally sized partitions.
-
click on the Default Setup menu and keep the mouse button depressed.
A menu will pop up, giving you the choice of Automatic" as well as 1" through 8" - select the option that best fits your needs.
The Partitioning bar will form the appropriate default. The first partition will be named QHD0: and the second partition will be named QHD1:, where Q is the first letter of the name of the drive manufacturer. You may rename to partitions using the method described in Renaming Partitions."
Saving and Formatting Your New Partitions
When you are satisfied with your new partitions, you must save them.
-
Select the Save gadget.
You will be returned to the Hard Drive Preparation, Partitioning and Formatting screen.
-
Your new partition information will be written to the hard disk.
-
Wait ten seconds and reboot your system.
An icon will appear for each partition on the hard disk. You must now format each partition to make it ready for use.
-
Format the first new partition by clicking on the icon and selecting the Format Disk item from the Icons menu.
-
Click on the first new partition. Select Rename from the Icons menu and change the name of the partition as desired.
Repeat steps 4 and 5 for each new partition.
Advanced Options with Partitioning
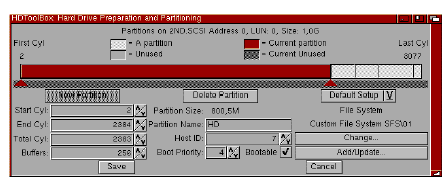
If you are an expert user there are a number of additional options that can be adjusted from within HDToolbox to give you more precise control over the parameters of your hard disk partitions. Be sure you understand these options before altering them.
These options are designed for advanced users who need full control of their partitions.
(To change the following text gadgets, click in the gadget, delete the existing number and type in the new value. Press Return after each entry.)
|
Start Cyl:
|
Displays the number of the first cylinder of the selected partition. This number can be any cylinder in the current partition except for the last cylinder, or any cylinder in the unused area before the partition. The Total Cyl number will be adjusted accordingly.
|
|
End Cyl:
|
Displays the number of the last cylinder of the selected partition. This number can be any cylinder in the partition except for the first cylinder, or any cylinder in the unused area after the partition. The Total Cyl number will be adjusted accordingly.
|
|
Total Cyl:
|
Displays the total number of cylinders of the selected partition. The End Cyl number will be adjusted accordingly.
|
|
Buffers:
|
Displays the number of sector cache buffers being used in the selected partition. Buffers improve disk access time but use 512 bytes of memory per buffer. You can use as many buffers as you wish, provided you have enough free memory. As a general rule, use 30 to 50 buffers per partition.
|
|
Bootable
|
Displays whether or not the selected partition can be used to boot the system. The default is bootable for the first partition and not bootable for all other partitions. Simply click in the gadget to toggle between bootable and not bootable.
|
To use a partition as the boot partition, you will first need to prepare it by performing the following steps: Format the partition; install your AmigaOS files on the partition; and then reboot your system. You can then run HDToolBox, return to the Partitioning screen, and select the Bootable gadget.
|
Boot Priority:
|
Allows you to determine which drive or partition will boot your system. This will only apply to bootable partitions. If you use a hard drive partition to boot, you should copy your AmigaOS files into that partition.
The value of Boot Priority can range from 127 to -128. A large value has higher priority than a lower value. The Amiga`s floppy disk drive (DF0:) has a Boot Priority of 5.
Never set a partition`s boot priority above 5. It is suggested that you set your boot partition`s priority to 1 and any other bootable partition to a priority of 0.
|