![]()
![]()
![]()
![]()
![]()
![]()
![]()
![]()
![]()
![]()
![]()
![]()
![]()
![]()
What does what
-
- The Transfer Button
- The Stop Button
- The Reset Button
- The About Button
- The Quit Button
- The Serial Port selection
- The Configure Button
- The "File to send" area
- The Open Button
- The "File to create" area
- The Progress Bar
- The Activity "Led"
- The Status bar
- The Menu bar
- The Transfer Button:
-

When you click on this button the file selected in the "File to send" area will be transfered to the Amiga, and created there as the file writen in the "File to Create" area (this must be a valid path/file). - The Stop Button:
-

This button will only be activated when you have started the transfer. If you click on it, WarTrans will try to stop the transfering process in a nice way. - The Reset Button:
-

Clicking here will reset all values in the WarTrans program, so if you think you have messed up something, just click here and everything should be set to default values. - The About Button:
-

If you click on this button you will get some information about WarTrans (version, creator, homepage etc.) - The Quit Button:
-

When finished, click here. If you click this button whan transfering, you will be asked if you are sure... - The Serial Port selection:
-

Select here which serial port to use. It's default selection is COM1. You can also change the configuration of your serial port by clicking on the Configure button (see below). - The Configure Button:
-

If you click on this button you will be taken to a menu where you can set the speed and the mode of the currently selected comport. (to change the speed on the Amiga side you have to edit the first line). - The "File to send" area:
-

Here you select the file you wish to send to the Amiga by either typing it in, selecting it from the drop down list, or browse to find it with the Open button. You can also DragDrop into the WarTrans program, and the filename will be added here. The file must exsist, and be the full path of the filename or it will cause an error (you will get a dialog box). - The Open Button:
-

Click on this button to brose for a file to transfer to the Amiga. If you select multriple files, they will be added to the dropdown list (the same goes for DragDroping into the WarTrans program). - The "File to create" area:
-

This is the name of the file you want to be created on the Amiga, it has to be a valid name (with full path) or else the AmigaBasic program will halt. Default value is 'RAM:WarTrans' (as an example) if you dont change this, the file you transfer can be found in the RAMdisk on your Amiga with the name WarTrans. Everything you write in here will be added to the dropdown list so you can easily access it later. - The Progress Bar:
-

This bar will show the progress of the current initiated transfer. The ratio of the transfer is shown in the middle panel of the status bar below. - The Activity "Led":
-


This "led" shows the activity of the WarTrans program, if it's red, it is waiting for information from the Amiga or receiving information, if it's green then the PC is transfering (sending) data to the Amiga. - The Status bar:
-


This bar is divided into three sections; the Activity "led", the thransfer ratio panel, and the quick help panel. The Activity "led" is explained abow. The transfer ratio panel shows how many bytes have been sent and the total number of bytes to send (guess what is what). The quick help panel shows a short expanation of what does what whan you hold the pointer over a button or an area. - The Menu bar:
-

The file menu takes care of all file actions. Oopen calls the same action as clicking on the Open button (se above), and Quit exits the program like the Quit button does (se above).
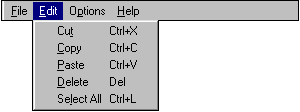
The edit menu is like the menu found in almost every program, it takes care of the cut, copy, paste, delete, and select all functions in the areas where you can type in text.
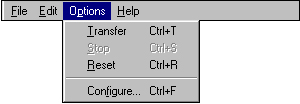
In this menu you will find all the actions of the program. Transfer initiates the filetransfer to the amiga like the Transfer button does (se above ). Stop interupts the current transfer (se the Stop button above). Reset calles the same action as the Reset button (mentioned above). And Configure let you go to a menu where you can configure the options for the currently selected comport (se above).
warlock@nvg.org