![]()
![]()
![]()

The PrinterGfx Preferences editor provides options to control the printing of graphics. Before using the PrinterGfx editor, be sure to select the printer driver for your printer with the Printer Preferences editor. Figure 9-2 illustrates the PrinterGfx Preferences editor window.
|
If you selected the PostScript printer driver, use the PrinterPS Preferences editor to make graphics settings. This overrides settings made in the PrinterGfx Preferences editor. |
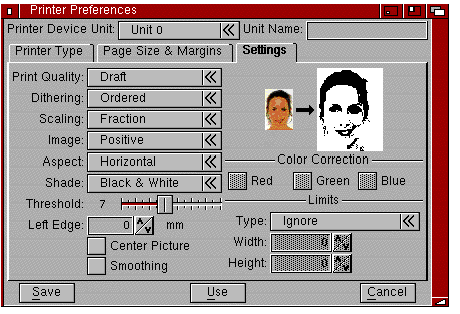
PrinterGfx Preferences Editor Window
The PrinterGfx Preferences editor contains the following gadgets:
Dithering prints patterns of dots in different colors (or different densities) so that they appear as one color or as shades of grey. This has the affect of smoothing out the picture and giving the impression of more colors. The available dithering options are:
Figure 9-3 illustrates the results of the different dithering methods; the pictures were generated on a 300 dot per inch printer.
Scaling is the process of changing the size of an image. The actual size of the printout is determined by the Limits setting, described on page 9-15. The available Scaling options are:
Determines whether an image is printed normally or with a reverse shading. This option affects only Black & White and grey scale printing. When set to Positive, the image is printed as it appears on the screen. When set to Negative, the image is reversed, similar to a photographic negative.
Determines the direction on the paper the image is printed. When set to Horizontal (often called Portrait), the image is printed as it appears on the screen. When set to Vertical (often called Landscape), the image is printed sideways.
Allows you to select the colors to print. Not all printers support these options. The available options are:
Determines the colors on the screen that are printed as black or as white. This setting is effective only in Black & White mode.
Increasing the Threshold value causes more colors to be printed as black. Figure 9-4 shows the results of different Threshold settings.
Figure 9-4. Threshold Settings
Selects the graphics print density. The lower the density, the faster the image prints on those printers with multiple densities. When a higher density is selected, more dots create a sharper image. However, it takes longer for the image to print.
This option is not supported by every printer.
Used to smooth any diagonal lines that appear jagged. This option is best suited for use with programs that do graphic dumps of text. When smoothing is turned on, printing may be slower.
Floyd-Steinberg dithering cannot be used with Smoothing.
Horizontally centers the printed picture on the page. Any value entered for the Left Offset is ignored when Center Picture is on.
Matches the colors on your printout more closely to the colors on the screen. Color correction can be used on red, green, or blue or on a combination of colors.
Color correction reduces the number of printed colors. When color correction is not used, all the available colors displayed by the Amiga can be printed on a color printer. For each color that is chosen for correction, several shades of that color are lost. The number of colors than can be printed is shown in the Colors gadget to the right of the color correction boxes.
![]()
![]()
![]()
![]()